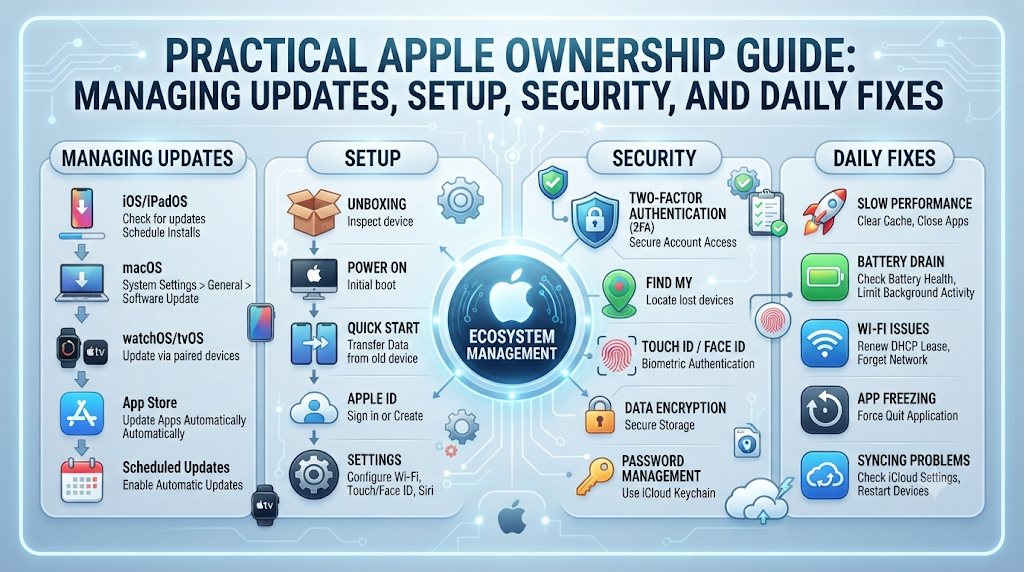
Buying an Apple product feels effortless at first. Everything looks clean out of the box, and the buttons make sense. Yet, the real test of owning an iPhone or Mac starts weeks or months later—when a major software release drops, your home Wi-Fi acts up, or you need to move years of personal memories onto a new screen.
Most people do not want dense engineering manuals. You just want clear answers that keep your photos safe, your battery healthy, and your private data locked down. That is the exact goal of this handbook. Written from the perspective of everyday device ownership, it walks you through software updates, fresh device setups, data transfers, backups, privacy protections, and quick desktop tricks. Whenever you need interactive tools or step-by-step device help along the way, Osnivo serves as a practical companion to help you understand and manage every part of your Apple hardware.
Why Taking Charge of Your Apple Devices Matters
Apple designs its hardware and software under one roof. Because of this close partnership, your iPhone, iPad, and Mac share files, passwords, and messages almost automatically. Still, relying completely on factory defaults leaves your devices vulnerable to battery drain, full storage, and unnecessary privacy risks.
Think of your Apple products like a well-built car. They run smoothly on their own, but checking the tires, updating the navigation maps, and locking the doors remain your job. Understanding six core operating systems—iOS, iPadOS, macOS, watchOS, tvOS, and visionOS—becomes much easier once you break ownership down into simple habits rather than technical rules.
Worth Remembering: Software eligibility and feature support are two different things. An older iPhone or Mac might install the newest operating system cleanly while still missing advanced tools, such as on-device Apple Intelligence features, that demand newer chips.
Planning Ahead for Major Software Upgrades
Every autumn, Apple rolls out major operating system upgrades packed with visual tweaks, productivity tools, and vital security patches. Before you tap the download button, take five minutes to check your hardware limits.
Checking iOS 27 Compatible iPhones Before Downloading
Apple supports older phones far longer than most smartphone makers, usually providing five to seven years of major system updates. However, every new release eventually leaves older processors behind. Before making plans, verify the official list of iOS 27 compatible iPhones by checking your exact model inside Settings > General > About.
Even when your phone qualifies for the upgrade, pause and ask a practical question: should I update to iOS 27 on day one?
Here is a realistic way to decide:
- Wait a Week if You Depend on Work Apps: Banking portals, medical apps, and corporate login tools sometimes crash right after a major iOS launch. Giving developers seven to ten days to push bug fixes saves you major headaches.
- Clear Out Breathing Room: Major installers require roughly 8 GB to 15 GB of free storage to unpack files safely. Check Settings > General > iPhone Storage first.
- Inspect Your Battery Health: Visit Settings > Battery > Battery Health & Charging. If your battery’s maximum capacity sits below 80 percent, heavy background indexing after an update can trigger sluggish performance or sudden shutdowns.
Reviewing macOS 27 Compatible Macs
Laptop and desktop users face a similar hardware checkpoint. Confirming macOS 27 compatible Macs comes down to the processor inside your computer. Click the Apple menu () at the top-left corner of your screen and select About This Mac.
Macs running on Apple silicon—such as M1, M2, M3, M4, or newer chips—support the broadest range of modern macOS features, including seamless iPhone Mirroring and advanced local AI processing. Older Intel-based Macs face stricter hardware cutoffs. Even if your Mac cannot install the newest macOS release, Apple typically delivers vital security patches for the previous two macOS versions, keeping your computer safe for daily browsing and work.
How to Set Up a New iPhone Without Losing Your Mind
Opening a brand-new iPhone box brings genuine excitement, yet rushing through the welcome screens often creates messy settings and missing apps. Taking a calm, structured approach to how to set up a new iPhone keeps your Apple Account, phone number, and personal layout intact from minute one.
A Smooth First-Time Setup Routine
- Prep Your Current Phone First: Connect your old iPhone to Wi-Fi, plug it into a charger, and make sure Bluetooth is switched on.
- Wake Up the New Device: Hold the side button on your new iPhone until the Apple logo appears. Pick your language and country.
- Trigger Quick Start: Place both phones side by side. A Set Up New iPhone card pops up on your old screen. Tap Continue, then hold your old phone’s camera over the swirling blue pattern on the new display.
- Set Up Face ID and a Strong Passcode: Scan your face carefully and create a six-digit passcode (or tap Passcode Options to choose a custom alphanumeric password).
- Move Your Cellular Plan: Follow the on-screen eSIM prompt to transfer your mobile number wirelessly from your old device without visiting a carrier store.
- Pick Your Transfer Style: Choose Transfer from iPhone for a direct wireless phone-to-phone copy, or select Download from iCloud if you want to start using the phone within minutes while apps download quietly in the background.
- Review Privacy Prompts Carefully: Decide which apps may track your location and choose whether Siri should respond when your screen is locked.
Switching Platforms: How to Transfer Data from Android to iPhone
Moving away from Android used to mean manually copying folders onto a computer. Today, Apple offers a free, official bridge called Move to iOS on the Google Play Store that handles the heavy lifting wirelessly. When you need to transfer data from Android to iPhone, preparation makes all the difference.
What Moves Across Automatically
- Contacts, call logs, and SMS text threads
- WhatsApp chat history and media
- Camera roll photos and videos
- Web browser bookmarks and email accounts
- Calendars and free apps available on both Google Play and the App Store
Step-by-Step Android-to-iPhone Transfer
- Download Move to iOS: On your Android handset, open the Google Play Store, search for Move to iOS, and install the app.
- Plug Both Phones Into Chargers: Data transfers consume serious battery power. Keep both devices connected to wall outlets and ensure Wi-Fi is turned on for the Android phone.
- Reach the Apps & Data Screen on iPhone: Follow the initial setup prompts on your new iPhone until you land on Transfer Your Apps & Data. Select From Android.
- Get Your Pairing Code: Tap Continue on the iPhone to generate a six-digit or ten-digit security code.
- Connect the Two Devices: Open Move to iOS on your Android phone, accept the terms, and type in the code shown on your iPhone. Your iPhone creates a temporary private Wi-Fi network for your Android phone to join automatically.
- Select Folders and Stay Patient: Tick the boxes for photos, messages, and contacts, then tap Continue. Leave both phones sitting untouched side by side until the loading bar on the iPhone finishes completely.
Practical Tip: Keep your old Android phone powered on and un-wiped for at least 48 hours after switching. Double-check that all family photos, WhatsApp chats, and authenticator apps work properly on your iPhone before erasing the old device.
A Beginner-Friendly iPhone Settings Guide
Factory settings are designed to show off bright screens and constant alerts in retail stores, not to preserve your battery or focus at home. Follow this practical iPhone settings guide right after setup to make your phone calmer and more efficient.
| Menu Section | Exact Path in Settings | Recommended Change | Everyday Benefit |
| Screen & Eye Comfort | Settings > Display & Brightness | Turn on Auto-Brightness and True Tone | Adjusts screen glow naturally and saves battery outdoors. |
| Control Center Shortcuts | Swipe down from top-right corner | Tap + to add Low Power Mode, Screen Recording, and Dark Mode | Lets you toggle essential tools in one tap from any screen. |
| Background Activity | Settings > General > Background App Refresh | Switch to Wi-Fi or disable for heavy social apps | Prevents idle apps from draining battery and mobile data. |
| Alert Management | Settings > Notifications > Scheduled Summary | Bundle non-urgent shopping and news alerts into two daily digests | Cuts constant screen wake-ups and keeps your lock screen clean. |
| Battery Longevity | Settings > Battery > Battery Health & Charging | Keep Optimized Battery Charging turned ON | Learns your daily charging routine to slow long-term battery wear. |
Protecting Your Memories: How to Back Up an iPhone
Phones get dropped in water, left in taxis, or damaged unexpectedly. Knowing how to back up an iPhone guarantees that losing a piece of hardware never means losing ten years of family photos and messages. You have two dependable choices, and both take only minutes to set up.
Option 1: Hands-Free iCloud Backup
iCloud saves a copy of your device over Wi-Fi every night while your phone is locked and plugged into power.
- Open Settings and tap [Your Name] at the top of the screen.
- Select iCloud, then tap iCloud Backup.
- Switch on Back Up This iPhone.
- Tap Back Up Now to create your baseline copy right away.
Keep in mind: Apple’s free tier includes 5 GB of storage, which fills up fast. Stepping up to an iCloud+ plan (starting at 50 GB) gives most users plenty of room for automatic daily backups.
Option 2: Encrypted Computer Backup (No Monthly Fee)
If you want a complete offline copy stored on your own computer without paying for cloud space, back up directly to a Mac or Windows PC.
- Connect your iPhone to your Mac using a USB-C or Lightning cable.
- Open Finder on your Mac (or the Apple Devices app on Windows) and click your iPhone in the left sidebar.
- Under the General tab, select Back up all of the data on your iPhone to this Mac.
- Tick Encrypt local backup and set a password you will never forget. Turning on encryption is critical because it includes your saved Wi-Fi passwords, Health records, and website logins.
- Click Back Up Now and wait for the progress bar to complete.
Essential iPhone Security Settings Checklist
Your smartphone holds bank logins, two-factor codes, private messages, and personal photos. Walk through this iPhone security settings checklist once every few months to keep both remote hackers and physical thieves locked out.
- Activate Stolen Device Protection: Open Settings > Face ID & Passcode, enter your passcode, and switch on Stolen Device Protection. Even if a thief watches you type your passcode in public and steals your phone, this feature blocks them from viewing saved passwords or changing your Apple Account password without your actual face.
- Confirm Find My iPhone Is Active: Go to Settings > [Your Name] > Find My > Find My iPhone and make sure Find My iPhone, Find My network, and Send Last Location are all enabled.
- Verify Two-Factor Authentication: Open Settings > [Your Name] > Sign-In & Security and confirm that Two-Factor Authentication is turned on for your Apple Account.
- Stop Cross-App Ad Tracking: Visit Settings > Privacy & Security > Tracking and turn off Allow Apps to Request to Track.
- Trim Location Permissions: Open Settings > Privacy & Security > Location Services and review apps one by one. Switch shopping, food, and weather apps from Always to While Using the App.
- Automate Rapid Security Patches: Go to Settings > General > Software Update > Automatic Updates and enable Security Responses & System Files so urgent fixes install automatically between major updates.
Everyday Fixes When Your iPhone Won’t Connect to Wi-Fi
Few things feel more irritating than sitting next to your router while web pages refuse to load. When your iPhone won’t connect to Wi-Fi, resist the urge to erase your phone. Follow these safe troubleshooting steps in order from easiest to deepest.
1. Refresh Your Wireless Radios
Swipe down from the top-right corner to open Control Center. Tap the Wi-Fi button off, count to ten, and tap it back on. Still stuck? Switch on Airplane Mode for 15 seconds, then toggle it off to force your iPhone’s wireless chip to search fresh.
2. Power-Cycle Both Your Router and Phone
Unplug your home Wi-Fi router from the wall socket for 30 seconds, then plug it back in. While the router restarts, turn your iPhone off by holding the side button and either volume button until the power slider appears, then turn it back on.
3. Forget the Network and Reconnect Fresh
Saved network profiles occasionally glitch after a router firmware update.
- Open Settings > Wi-Fi.
- Tap the blue Info icon (i) beside your Wi-Fi name.
- Select Forget This Network and confirm.
- Tap your Wi-Fi network again from the list and type the password carefully.
4. Pause Active VPN Apps
VPN apps route your traffic through external servers. When a VPN server stalls, your entire internet connection freezes even though your Wi-Fi bars look full. Open Settings > General > VPN & Device Management and switch any active VPN to Not Connected to test your speed.
5. Reset Network Settings (When Nothing Else Works)
If your iPhone fails to join any Wi-Fi network at home, work, or a coffee shop, clear out your network configuration. Open Settings > General > Transfer or Reset iPhone > Reset > Reset Network Settings.
Heads Up: Resetting network settings leaves your photos, messages, and apps completely untouched, but it wipes all saved Wi-Fi passwords, paired Bluetooth accessories, and custom VPN profiles. Have your Wi-Fi password ready before tapping reset.
Creating Clean Tutorials with QuickTime Player Screen Recording on Mac
Sometimes showing someone how to click a button beats writing a five-paragraph email. Built right into macOS, QuickTime Player screen recording Mac tools let you capture crisp walkthrough videos without paying for extra software.
How to Record Your Mac Screen in Six Steps
- Launch QuickTime Player: Press Command + Space, type QuickTime Player, and hit Return.
- Open the Screen Recorder: In the top menu bar, click File > New Screen Recording (or use the shortcut Control + Command + N).
- Pick Your Capture Area: Use the floating toolbar at the bottom of your screen to choose between recording the Entire Screen or dragging a frame around a Selected Portion.
- Adjust Microphone and Click Options: Click Options on the toolbar. Select your microphone if you want to explain steps out loud, pick where the file saves (like Desktop), and enable Show Mouse Clicks so viewers can follow your cursor easily.
- Start Capturing: Click Record and walk through your demonstration smoothly.
- Stop and Trim: Click the circular Stop icon in the top-right menu bar. QuickTime opens your recording immediately—press Command + T if you want to trim awkward pauses from the beginning or end before saving.
Four Habits That Prevent Most Apple Headaches
Over time, small routine habits save far more trouble than emergency fixes. Avoid these four common missteps:
- Skipping Pre-Update Backups: Updates rarely go wrong, yet a sudden battery drop or low-storage glitch can stall an installation. Always verify your latest backup date before upgrading iOS or macOS.
- Letting Storage Hit 99 Percent Full: Keep at least 10 percent of your iPhone or Mac storage free. Devices starved for space struggle to install security updates, sync photos, or run smoothly.
- Installing Third-Party “Phone Cleaner” Apps: iOS and macOS manage memory automatically. Third-party RAM boosters and cleaner apps waste money and often collect unnecessary usage data.
- Using Weak Four-Digit Passcodes: Upgrade to a six-digit or custom alphanumeric passcode under Settings > Face ID & Passcode to make shoulder-surfing far harder.
Practical Utilities on Osnivo for Everyday Apple Owners
When you manage multiple devices or prepare for a major upgrade, having structured checklists removes the guesswork. Osnivo brings together focused utilities tailored to real Apple ownership tasks:
- Apple Device Compatibility Checker: Confirm whether your exact iPhone, iPad, or Mac model supports upcoming operating system versions before downloading large installers.
- Should I Update Tool & Update Readiness Checker: Weigh your device’s age, battery health, and free storage before jumping onto a brand-new software release.
- Setup Companion & Migration Planner: Follow clear, step-by-step checklists when setting up a new iPhone or moving data over from Android.
- Settings Pathfinder & Security Checkups: Track down hidden privacy menus and verify your account protections without digging through dozens of sub-menus.
- Osnivo Fix & Backup Planning Resources: Troubleshoot Wi-Fi drops, sync delays, and battery drain safely while keeping your backup schedule reliable.
Frequently Asked Questions (FAQs)
1. Where can I verify the official list of iOS 27 compatible iPhones?
Open Settings > General > About on your iPhone to check your exact model name, then compare it against Apple’s official iOS compatibility page on Apple Support or check it inside Osnivo’s Device Compatibility Checker.
2. Should I update to iOS 27 immediately or wait for the first patch?
If you use your iPhone for critical banking, business, or travel apps, waiting one to two weeks after the initial release allows app developers to fix compatibility bugs and lets Apple release stability patches.
3. How long does Quick Start take when learning how to set up a new iPhone?
Most wireless Quick Start transfers finish in 15 to 45 minutes, depending on your Wi-Fi speed and how many gigabytes of photos and videos are stored on your old phone.
4. Does Move to iOS erase my old phone when I transfer data from Android to iPhone?
No. Move to iOS copies your photos, messages, contacts, and supported apps onto your new iPhone while leaving everything intact on your Android device.
5. Why does my iPhone connect to Wi-Fi at work but say “No Internet Connection” at home?
That message means your iPhone successfully reached your home router, but the router is not receiving internet from your modem or service provider. Unplugging both your modem and router for 30 seconds usually restores the connection.
6. How do I check macOS 27 compatible Macs before upgrading my MacBook?
Click the Apple menu () in the top-left corner of your screen and choose About This Mac. Review your chip type (Apple silicon M-series vs. Intel) and model year against Apple’s official macOS system requirements.
7. What is the difference between syncing with iCloud Photos and running an iCloud Backup?
When iCloud Photos is turned on, your pictures live in iCloud and sync across all your devices automatically, so they are not duplicated inside your daily iCloud Backup file. If iCloud Photos is turned off, your camera roll is saved inside your iCloud Backup instead.
8. Which single adjustment in an iPhone settings guide saves the most battery?
Opening Settings > Battery to spot background-draining apps, turning on Auto-Brightness, and keeping Optimized Battery Charging enabled deliver the biggest everyday battery gains without hurting usability.
9. Can QuickTime Player screen recording on Mac record internal computer audio?
By default, QuickTime Player captures your screen video and audio from your built-in or external microphone. Recording internal system sound requires installing a virtual audio driver or using macOS’s Screenshot toolbar (Shift + Command + 5) with compatible audio routing.
10. What is the first item I should turn on from an iPhone security settings checklist?
Enable Stolen Device Protection under Settings > Face ID & Passcode and confirm Two-Factor Authentication is active for your Apple Account. Together, they block unauthorized password changes even if someone sees your passcode.
Wrapping Up
Owning Apple devices works best when you combine simple preventive habits with clear settings. Checking hardware support before upgrading, taking ten minutes to customize privacy and battery menus, automating your backups, and knowing safe Wi-Fi fixes keep your iPhone and Mac dependable year after year.
Take two minutes right now to check two things on your phone: verify your latest backup date under Settings > [Your Name] > iCloud > iCloud Backup, and make sure Stolen Device Protection is switched on. Whenever you want clear setup walkthroughs, update readiness checks, or troubleshooting guides, visit Osnivo to keep your Apple ecosystem running at its best.
