Hey all,
I would like to share my experience with you, focusing on various automation testing tools that have proven instrumental in enhancing our testing processes. Exploring these tools not only facilitated our testing endeavors but also broadened our understanding of the ever-evolving landscape of software testing.
Automation testing.
Automation testing is a vital software testing method that employs specific tools and scripts to conduct tests on software applications. This technique utilizes automated testing software to run pre-defined tests on applications, validating their functionality, performance, and other aspects. The primary goal of automation testing is to enhance the efficiency, effectiveness, and coverage of the testing process by automating repetitive and time-consuming manual testing tasks. Automated tests can be executed swiftly, repeatedly, and consistently. This allows for early defect detection, ensures high software quality, and expedites the software release process.
Automation testing is vital in the software development lifecycle for several reasons. It involves utilizing tools and technology to test software, aiming to reduce testing efforts, accelerate delivery, and enhance affordability. By automating repetitive testing tasks, it enables the development of high-quality software with reduced human effort and minimized errors.
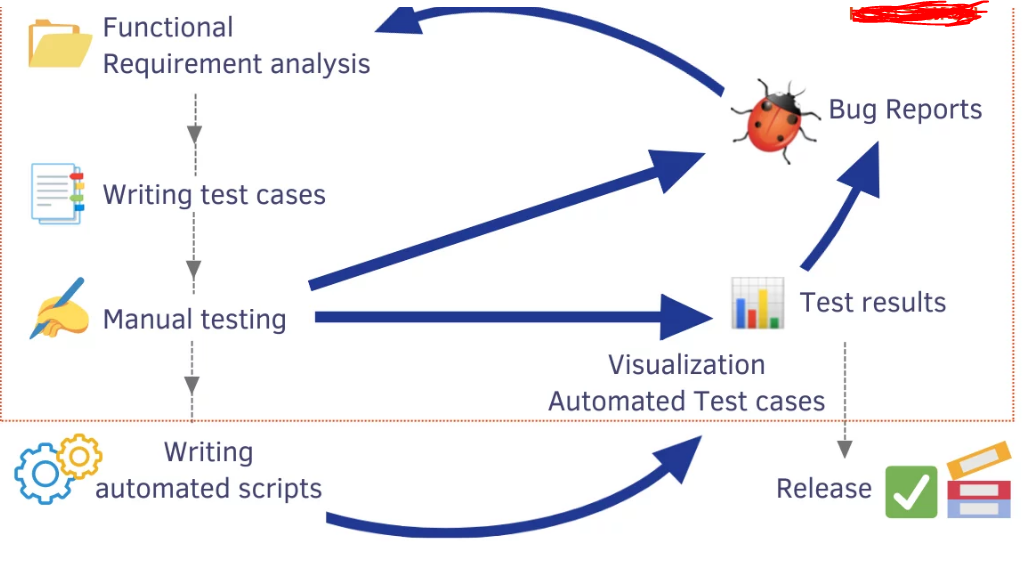
Although many companies use automation testing to some extent, there is often a reliance on manual tests due to a lack of understanding about how to fully leverage automated testing benefits. Manual testing involves executing predetermined test cases, comparing results with expected outcomes, and recording the results. However, it is time-consuming, error-prone, and challenging to execute across multiple platforms whenever source code changes.
Implementing automated testing requires a significant initial investment in terms of time and effort, but the financial commitment is relatively low, especially when starting on a small scale. There are various open-source test automation tools available, making them accessible for organizations, even in the early stages of automation adoption.
Companies, particularly those whose primary products are not software-based, may hesitate to invest in automation testing, fearing uncertain returns on investment. However, understanding and implementing automation effectively can significantly improve testing efficiency, reduce costs, and enhance the overall quality of software products.
Why Automation Testing Tool is important?

automation testing tools are indispensable as they enhance efficiency, accuracy, cost-effectiveness, and test coverage, and enable early bug detection. They play a pivotal role in ensuring high-quality software products and facilitating faster, more reliable software releases.
- Efficiency: These tools execute tests swiftly and repeatedly, ensuring comprehensive test coverage in a fraction of the time taken manually. This rapid execution accelerates the testing process, providing prompt feedback to developers.
- Accuracy: Automated tests perform the same steps consistently with precision, eliminating the risk of human error. This consistency leads to reliable and accurate assessments of software quality.
- Cost-Effectiveness: While there is an initial investment in setting up automation, it significantly reduces the need for a large manual testing team. Automated tests can run overnight or concurrently, optimizing resource utilization and reducing overall testing expenses.
- Reusability: Test scripts created with automation tools can be employed across different projects and test cycles, saving time and effort. This reusability ensures consistent testing standards across multiple applications.
- Regression Testing: Automation tools are ideal for regression testing, enabling teams to swiftly verify existing functionalities after code changes. This ensures that new updates do not adversely affect previously functioning features.
- Continuous Integration and Continuous Deployment (CI/CD): Automation testing seamlessly integrates with CI/CD pipelines, ensuring that tests run automatically whenever new code is committed. This facilitates faster and more dependable releases.
- Comprehensive Test Coverage: Automation tools can execute a large number of test cases, covering various scenarios, including edge cases and boundary conditions. Achieving such comprehensive coverage manually within a reasonable timeframe is challenging.
- Data-Driven Testing: Automation tools support data-driven testing, allowing the same test script to be executed with multiple sets of data. This versatility enhances test coverage and ensures robust application testing.
- Early Bug Detection: Automation testing facilitates the early detection of bugs and issues, enabling developers to address them promptly. Early bug detection minimizes the likelihood of defects reaching the production stage.
- Support for Complex Applications: Automation tools can simulate intricate user interactions, test scenarios involving numerous users, and handle complex application workflows. This capability is vital for testing modern and sophisticated software applications.
- Coverage: Automation testing can help to improve test coverage by executing a wider range of tests than would be possible with manual testing. This is because automated tests can be run unattended and overnight.
- Repeatability: Automation testing can help to ensure that tests are executed consistently and repeatably. This is important for tracking progress over time and identifying trends.
Here are some specific examples of how automation testing is being used today:
- Google uses automation testing to test its search engine billions of times a day. This helps to ensure that the search engine is working properly and delivering accurate results to users.
- Amazon uses automation testing to test its e-commerce platform for scalability and performance. This is important because Amazon needs to be able to handle millions of transactions per day during peak shopping periods.
- Microsoft uses automation testing to test its Windows operating system and other software products. This helps to ensure that the software is bug-free and reliable.
These are just a few examples of how automation testing is being used today. As software becomes more complex and demanding, automation testing will become even more important for ensuring the quality and reliability of software products.
Top Automation Testing Tools name.
Here are 10 popular automation testing tools used in the software industry
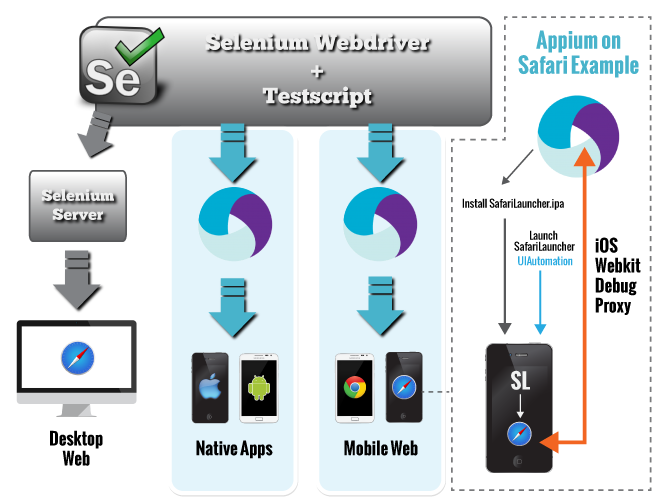
- Selenium: Selenium is a widely used open-source tool designed for automating web browsers. It offers a range of tools and libraries for various programming languages, enabling the automation of web applications for testing purposes.
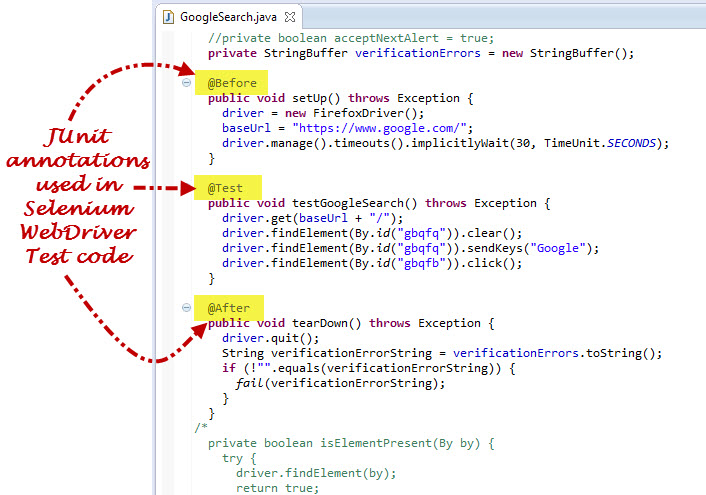
- JUnit: JUnit is a popular testing framework primarily used for Java applications. It provides annotations for defining test methods and assertions for verifying expected outcomes, making it essential for Java unit testing.
- TestNG: TestNG, inspired by JUnit and NUnit, is a flexible testing framework suitable for Java applications. It stands out for its test configuration options and parallel test execution capabilities, making it widely adopted in Java testing projects.
- Cucumber: Cucumber is a behavior-driven development (BDD) tool that allows the creation of test scenarios in a human-readable format. It promotes collaboration between technical and non-technical stakeholders by providing a common language for testing.
- Jenkins: Jenkins is a popular open-source automation server used for building, testing, and deploying software. It offers extensive plugin support, allowing customization for various testing and integration needs.
- Appium: Appium is an open-source tool designed for automating mobile applications on both Android and iOS platforms. It supports native, hybrid, and mobile web applications, making it a preferred choice for mobile app testing.
- SoapUI: SoapUI is a versatile API testing tool used for functional, security, and load testing of REST and SOAP web services. Its user-friendly interface simplifies designing and executing tests on APIs, ensuring robust testing processes.
- Postman: Postman is a widely-used API testing tool known for its simplicity and intuitive interface. It enables developers to create and send HTTP requests for testing REST APIs. Postman also offers automation and collaboration features.
- Katalon Studio: Katalon Studio is an integrated automation testing tool that supports web, API, and mobile testing. It provides a user-friendly interface and allows scripting as well as low-code/no-code approaches, catering to various testing requirements.
- SikuliX: SikuliX is a powerful scripting/automation technology that relies on pattern matching. It can automate tasks by recognizing elements displayed on the screen, making it useful for applications with non-standard controls and interfaces.
Please note that the effectiveness of these tools can vary based on specific project requirements, so it’s essential to evaluate them thoroughly before choosing one for your testing needs.
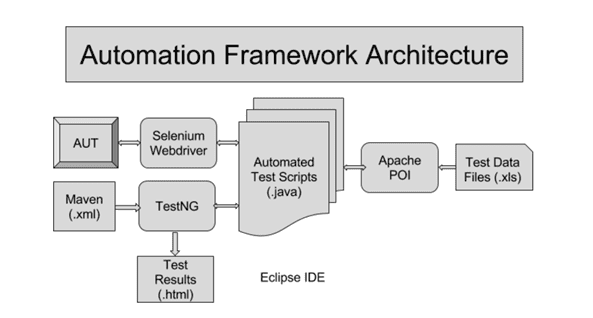
How to use Selenium for website testing?
Selenium is a powerful tool for automating web browsers, making it a popular choice for website testing. Here’s a step-by-step guide to help you get started with Selenium testing:
1. Choose a Programming Language: Selenium supports various programming languages like Java, Python, C#, and more. Choose a language you are comfortable with and set up your development environment.
2. Install Selenium WebDriver: Install the Selenium WebDriver for your preferred browser (e.g., Chrome, Firefox). WebDriver acts as a bridge between your tests and the web browser.
3. Write Your First Test Script: Create a new test script in your chosen programming language. Initialize the WebDriver for the browser you intend to test.
Example (Java):
java code:
WebDriver driver = new ChromeDriver(); driver.get("https://example.com");
4. Locate Web Elements: Use various locators like ID, class name, Xpath, etc., to locate web elements such as buttons, input fields, or links on the web page.
Example (Java):
java code:
WebElement usernameField = driver.findElement(By.id("username")); usernameField.sendKeys("yourusername"); WebElement passwordField = driver.findElement(By.id("password")); passwordField.sendKeys("yourpassword");
5. Perform Actions and Assertions: Interact with web elements by performing actions like clicking, typing, or submitting forms. Use assertions to validate expected outcomes.
Example (Java):
java code
WebElement loginButton = driver.findElement(By.id("loginButton")); loginButton.click(); String pageTitle = driver.getTitle(); Assert.assertEquals("Expected Page Title", pageTitle);
6. Implement Explicit Waits: Use explicit waits to ensure that the web elements have loaded before performing actions on them. This prevents synchronization issues between your tests and the web page.
Example (Java):
java code
WebDriverWait wait = new WebDriverWait(driver, 10); WebElement element = wait.until(ExpectedConditions.elementToBeClickable(By.id("someElement")));
7. Run and Debug Your Tests: Run your Selenium tests and observe the browser automation. Use debugging tools provided by your IDE to troubleshoot any issues that may arise during testing.
8. Integrate with Test Frameworks: For advanced test management and reporting, integrate Selenium with popular test frameworks like TestNG or JUnit.
By following these steps and exploring Selenium’s vast capabilities, you can create robust and efficient automated tests for your websites, ensuring their functionality and reliability.
How to use JUnit for website testing?
JUnit is a widely used testing framework for Java applications. It provides a platform for developers to write and run unit tests to ensure that individual parts of their Java code are functioning as expected. Here’s an overview of JUnit:
Key Concepts:
1. Test Cases:
- In JUnit, tests are organized into test cases, which are Java classes containing one or more test methods.
- Each test method is annotated
@Testto indicate that it’s a test case.
java
import org.junit.Test; public class MyTestClass { @Test public void testAddition() { // Test logic here } }
2. Assertions:
- Assertions are used to verify the expected outcomes of the test cases.
- Common assertion methods are provided by the
org.junit.Assertclass.
java
import org.junit.Assert; import org.junit.Test; public class MyTestClass { @Test public void testAddition() { int result = Math.add(2, 3); Assert.assertEquals(5, result); } }
3. Test Lifecycle:
- JUnit provides annotations to manage the test lifecycle, such as
@Before,@After,@BeforeClass, and@AfterClass. @Beforeand@Aftermethods are run before and after each test method.@BeforeClassand@AfterClassmethods are run once before and after all test methods in the test class.
java
import org.junit.Before; import org.junit.After; public class MyTestClass { @Before public void setUp() { // Code executed before each test method } @After public void tearDown() { // Code executed after each test method } }
4. Parameterized Tests:
- JUnit allows parameterized tests using the
@RunWith(Parameterized.class)annotation. - This enables running the same test logic with multiple sets of data.
java
import org.junit.Test; import org.junit.runner.RunWith; import org.junit.runners.Parameterized; import java.util.Arrays; import java.util.Collection; @RunWith(Parameterized.class) public class MyParameterizedTest { private int input; private int expected; public MyParameterizedTest(int input, int expected) { this.input = input; this.expected = expected; } @Parameterized.Parameters public static Collection<Object[]> data() { return Arrays.asList(new Object[][]{ {1, 2}, {2, 4}, {3, 6} }); } @Test public void testMultiplication() { Assert.assertEquals(expected, input * 2); } }
5. Test Runners:
- JUnit provides various test runners for different purposes, such as
@RunWith(Suite.class)for running multiple test classes together and@RunWith(Parameterized.class)for parameterized tests.
java
import org.junit.runner.RunWith; import org.junit.runners.Suite; @RunWith(Suite.class) @Suite.SuiteClasses({ MyTestClass1.class, MyTestClass2.class }) public class TestSuite { // This class remains empty }
JUnit is a versatile and powerful testing framework that supports a wide range of testing scenarios in Java applications. By understanding these key concepts, developers can create effective and reliable unit tests for their Java code.
How to use TestNG for website testing?
TestNG is a flexible and powerful testing framework for Java applications. It supports a variety of testing scenarios, including unit testing, integration testing, end-to-end testing, and more. Here’s an overview of TestNG and its key features:
Key Concepts:
1. Test Annotations:
- TestNG uses annotations to mark methods as test cases.
- Annotations like
@Test,@BeforeMethod,@AfterMethod,@BeforeClass, and@AfterClassare used to define test methods and set up/tear down procedures.
java
import org.testng.annotations.Test; public class MyTestClass { @Test public void testAddition() { // Test logic here } }
2. Parameterized Tests:
- TestNG allows parameterized tests using the
@Parametersannotation. - Parameters are defined in XML or as data providers in the test class.
java
import org.testng.annotations.Parameters; import org.testng.annotations.Test; public class MyParameterizedTest { @Parameters({"input", "expected"}) @Test public void testMultiplication(int input, int expected) { // Test logic here } }
3. Test Groups:
- TestNG supports test groups to categorize tests.
- Groups are specified using the
@Test(groups = "groupname")annotation. - Helps in running specific subsets of tests.
java
import org.testng.annotations.Test; public class MyGroupedTest { @Test(groups = "smoke") public void testSmokeScenario() { // Test logic for smoke scenario } }
4. Dependencies:
- TestNG allows specifying test method dependencies.
- A test method will only run if all the methods it depends on have passed successfully.
java
import org.testng.annotations.Test; public class MyDependencyTest { @Test public void setupDatabase() { // Setup database logic } @Test(dependsOnMethods = "setupDatabase") public void testDatabaseConnection() { // Test database connection logic } }
5. Listeners and Reporters:
- TestNG provides listeners to customize test execution behavior.
- Reporters can be implemented to generate customized test reports.
6. Parallel Execution:
- TestNG allows running tests in parallel, enhancing test execution speed.
- Parallel execution can be configured at various levels: methods, classes, suites, etc.
XML
<suite name="MyTestSuite" parallel="tests" thread-count="5"> <!-- Test configurations --> </suite>
7. Data Providers:
- TestNG supports data providers for parameterized testing.
- Data providers supply data to test methods, enabling data-driven testing.
java
import org.testng.annotations.DataProvider; import org.testng.annotations.Test; public class MyDataDrivenTest { @DataProvider(name = "testData") public Object[][] testData() { // Provide test data } @Test(dataProvider = "testData") public void testDataDrivenScenario(String param1, int param2) { // Test logic with provided data } }
TestNG provides a rich set of features and functionalities, making it a popular choice for Java developers for various testing needs. By leveraging these concepts, developers can create efficient and comprehensive test suites to ensure the reliability and quality of their Java applications.
How to use Cucumber for website testing?
Cucumber is a popular behavior-driven development (BDD) tool used for writing acceptance tests for web applications. It allows collaboration between technical and non-technical stakeholders by defining test cases in a human-readable format. Cucumber tests are written in a language called Gherkin, which is easy to understand for domain experts and business stakeholders. Here’s an overview of Cucumber and its key features:
Key Concepts:
1. Gherkin Language:
- Cucumber tests are written in Gherkin language, which uses plain-text specifications to describe the behavior of an application.
- Gherkin features consist of scenarios written in a Given-When-Then format, making them readable and understandable by both technical and non-technical stakeholders.
gherkin
Feature: Login Functionality Scenario: Successful Login Given the user is on the login page When the user enters valid credentials Then the user should be redirected to the dashboard
2. Step Definitions:
- Step definitions are written in programming languages like Java, Ruby, or JavaScript.
- Each step in a scenario is mapped to a corresponding step definition method, where the actual test logic is implemented.
java
import io.cucumber.java.en.Given; import io.cucumber.java.en.When; import io.cucumber.java.en.Then; public class StepDefinitions { @Given("the user is on the login page") public void navigateToLoginPage() { // Navigate to the login page } @When("the user enters valid credentials") public void enterValidCredentials() { // Enter valid credentials } @Then("the user should be redirected to the dashboard") public void verifyDashboardRedirection() { // Verify dashboard redirection logic } }
3. Feature Files:
- Feature files contain Gherkin scenarios and are used as a source of truth for the application’s behavior.
- Feature files are typically stored in the “features” directory of the Cucumber project.
4. Tags and Hooks:
- Cucumber supports tagging scenarios for categorization.
- Hooks allow setup and teardown actions before and after scenarios, allowing for common operations like data setup or cleanup.
gherkin
@smoke Scenario: Successful Login for Admin User Given the user is an admin When the admin user logs in Then the admin user should be redirected to the admin dashboard
5. Data Tables and Scenario Outline:
- Cucumber allows passing data tables to steps for parameterized testing.
- Scenario Outline allows the creation of templates for scenarios, which are filled with data from example tables.
gherkin
Scenario Outline: User Registration with Multiple Users Given the user is on the registration page When the user enters "<username>" and "<email>" Then the user registration should be "<status>" Examples: | username | email | status | | user1 | user1@example.com | success | | user2 | user2@example.com | success |
Cucumber’s strength lies in its ability to bridge the communication gap between technical and non-technical stakeholders. By writing tests in a natural language format and implementing the corresponding step definitions, teams can ensure that the application’s behavior aligns with the desired business outcomes.
How to use Jenkins for website testing?

Using Jenkins for website testing involves setting up automated jobs that run test scripts whenever there are code changes or scheduled intervals. Here’s a step-by-step guide on how to use Jenkins for website testing:
Prerequisites:
- Jenkins Installation: Ensure Jenkins is installed and running on your server.
- Version Control System: Your website’s source code should be stored in a version control system like Git.
- Testing Framework: Choose a testing framework (e.g., Selenium with JUnit/TestNG) for your website.
- Build Tools: If your testing project requires build tools like Maven or Gradle, ensure they are configured.
Steps to Set Up Jenkins for Website Testing:
1. Create a New Jenkins Job:
- Open Jenkins and create a new “Freestyle project” or “Pipeline” job.
- Configure the basic job settings, such as the project name and description.
2. Configure Source Code Management:
- Choose your version control system (e.g., Git) and provide the repository URL.
- Specify the branches to build (usually “/main” or “/master”).
3. Configure Build Triggers:
- Choose how Jenkins triggers the build. Common options include “Poll SCM” to check for changes in the repository or webhook triggers for Git events.
- For continuous integration, trigger the build whenever changes are pushed to the repository.
4. Set Up Build Steps:
- Add build steps to execute your testing scripts.
- If you’re using Maven or Gradle, add build commands to run your tests. For example:
bash
mvn clean test- If you’re using shell or batch scripts, include the commands to run your tests.
5. Post-Build Actions:
- Configure post-build actions such as sending email notifications, archiving artifacts, or publishing test reports.
- If your testing framework generates reports, archive or publish these reports as artifacts.
6. Configure Test Reports:
- If you’re using JUnit, TestNG, or other test frameworks, configure Jenkins to parse the test result XML files.
- In the job configuration, under “Post-build Actions,” add “Publish JUnit test result report” and specify the path to your test result XML files.
7. Save and Build:
- Save your Jenkins job configuration and trigger a manual build to ensure everything is set up correctly.
- Monitor the console output for any errors during the build process.
8. Schedule Periodic Builds (Optional):
- If you want to run tests at specific intervals, configure the job to run periodically (e.g., every night).
- Use the “Build periodically” option to set up the schedule using cron syntax.
9. View Test Results:
- Once the build is triggered, Jenkins will execute the tests and display the results in the job dashboard.
- You can view detailed test reports, including pass/fail status and any errors or failures.
By following these steps, you can set up Jenkins to automate website testing. Jenkins will continuously monitor your version control system, triggering automated tests whenever there are changes in the codebase, ensuring the stability and quality of your website.
How to use Appium for website testing?
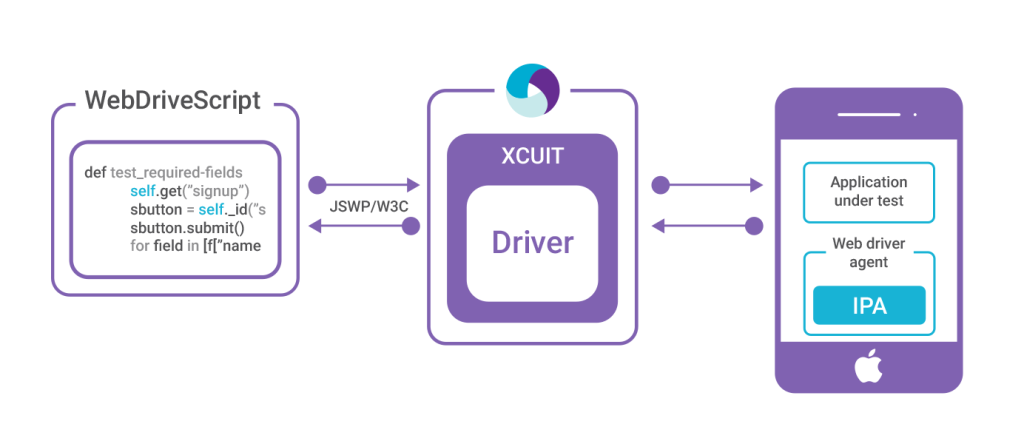
Appium is an open-source automation testing framework for mobile applications. It supports both Android and iOS platforms and allows you to write tests using various programming languages such as Java, Python, Ruby, and JavaScript. Appium provides a simple and easy-to-use API, making it a popular choice for mobile app testing. Here’s how you can use Appium for mobile application testing:
Prerequisites:
- Appium Installation: Ensure you have Appium installed on your system. You can install it using Node.js and npm.
- Mobile Devices: Set up emulators/simulators or connect real devices for testing. Ensure USB debugging is enabled for Android devices.
- Appium Client Libraries: Depending on the programming language you choose, install the appropriate Appium client library. For example, for Java, you can use Selenium’s WebDriver for Appium (Java client).
Steps to Use Appium for Mobile Application Testing:
1. Start the Appium Server:
- Launch the Appium server by running the command:
appiumin your terminal or command prompt. This will start the Appium server, which acts as a bridge between your tests and the mobile devices/emulators.
2. Create Your Test Script:
- Write your test script using the chosen programming language and Appium client library.
- Set up the desired capabilities to specify the platform, device, app path, automation name, and other relevant configurations.
java
import io.appium.java_client.AppiumDriver; import io.appium.java_client.MobileElement; import io.appium.java_client.android.AndroidDriver; import org.openqa.selenium.remote.DesiredCapabilities; import java.net.URL; public class AppiumTest { public static void main(String[] args) { // Set up desired capabilities DesiredCapabilities capabilities = new DesiredCapabilities(); capabilities.setCapability("platformName", "Android"); capabilities.setCapability("deviceName", "emulator-5554"); capabilities.setCapability("app", "path/to/your/app.apk"); // Initialize the driver AppiumDriver<MobileElement> driver; try { driver = new AndroidDriver<>(new URL("http://0.0.0.0:4723/wd/hub"), capabilities); } catch (Exception e) { e.printStackTrace(); return; } // Perform actions on the app MobileElement element = driver.findElementById("your_element_id"); element.click(); // Close the driver session driver.quit(); } }
3. Run Your Test Script:
- Execute your test script, and Appium will interact with the specified mobile device/emulator, performing the actions defined in your script.
4. Inspect Elements and Interact:
- Use Appium Inspector or UIAutomatorViewer for Android and Appium Inspector for iOS to inspect elements in your app.
- Interact with elements using methods like
driver.findElementById(),element.sendKeys(),element.click(), etc.
5. Assertions and Verifications:
- Implement assertions to verify the expected behavior of your mobile app.
- Use standard Java assertion methods or testing frameworks like TestNG or JUnit for structured verifications.
6. Generate Reports (Optional):
- If needed, integrate reporting tools to generate detailed test reports for your mobile automation tests.
By following these steps and customizing your test scripts based on your application’s functionality, you can effectively use Appium for mobile application testing, ensuring the quality and reliability of your mobile apps.
How to use SoapUI for website testing?
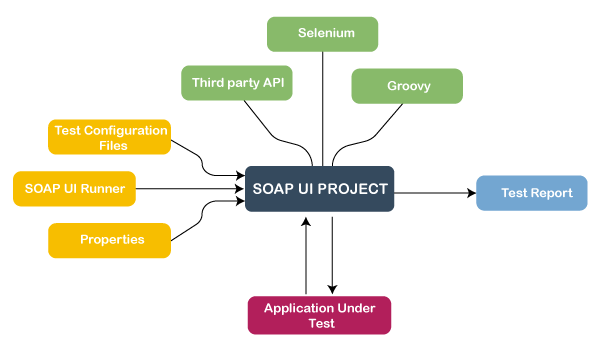
SoapUI is an open-source tool for functional and performance testing of web services and APIs. It provides a user-friendly interface for creating, managing, and executing various types of tests on SOAP, REST, and other web services. Here’s how you can use SoapUI for testing web services and APIs:
Prerequisites:
- SoapUI Installation: Ensure you have SoapUI installed on your system. You can download it from the official website and install it on your machine.
- WSDL or API Documentation: Obtain the WSDL (Web Services Description Language) file for SOAP services or the API documentation for REST services that you want to test.
Steps to Use SoapUI for Web Service Testing:
1. Create a New SoapUI Project:
- Open SoapUI and create a new project by providing the WSDL URL or API documentation URL.
- SoapUI will generate requests based on the provided WSDL or API documentation.
2. Create Test Suites and Test Cases:
- Within the project, create test suites to organize your test cases.
- Inside each test suite, create test cases representing different scenarios you want to test.
3. Add Test Steps:
- For each test case, add test steps to perform specific actions like sending requests, extracting data, or validating responses.
- Test steps can include HTTP requests, JDBC requests, assertions, data sources, and more.
4. Configure Request Parameters:
- Configure the request parameters such as endpoint URL, headers, request method, request body (for POST or PUT requests), and any query parameters.
- SoapUI provides a user-friendly interface to input and modify these parameters.
5. Assertions and Validations:
- Add assertions to verify the response data, HTTP status codes, or other criteria.
- Common assertions include “XPath Match,” “Contains,” “Not Contains,” “Valid HTTP Status Codes,” etc.
- Assertions help in validating the correctness of the responses.
6. Data-Driven Testing (Optional):
- Use data sources like Excel, CSV, or databases to perform data-driven testing.
- Configure test steps to use data from external sources, allowing you to run tests with multiple sets of data.
7. Security Testing (Pro Version):
- SoapUI Pro version provides features for security testing, including penetration testing and vulnerability scanning.
- These features allow you to identify and fix security vulnerabilities in your web services.
8. Run Tests:
- Run individual test cases, test suites, or the entire project to execute the tests against the specified services.
- SoapUI will display detailed logs and results for each test step and assertion.
9. Generate Reports:
- Generate comprehensive reports to analyze the test results and share them with the team.
- SoapUI allows exporting reports in various formats, making it easy to share test results with stakeholders.
By following these steps, you can effectively use SoapUI to test your web services and APIs, ensuring their functionality, reliability, and security.
How to use Postman for website testing?
Postman is a popular API testing tool that can also be used for website testing. To use Postman for website testing, you can use the following steps:
- Create a Postman collection. A Postman collection is a group of related requests. For website testing, you can create a collection for each web page or website feature that you want to test.
- Add requests to your collection. Each request in your collection will represent a different action that you want to perform on the web page or website feature. For example, you might have a request to navigate to the web page, a request to click on a button, or a request to enter text into a field.
- Configure your requests. For each request, you will need to specify the following:
- The HTTP method (e.g., GET, POST, PUT, DELETE)
- The request URL
- Any request headers or body
- Send your requests. Once you have configured your requests, you can send them to the web server using the Postman Runner.
- Verify the results. Once the requests have been sent, you can verify the results to ensure that the web page or website feature is working as expected.
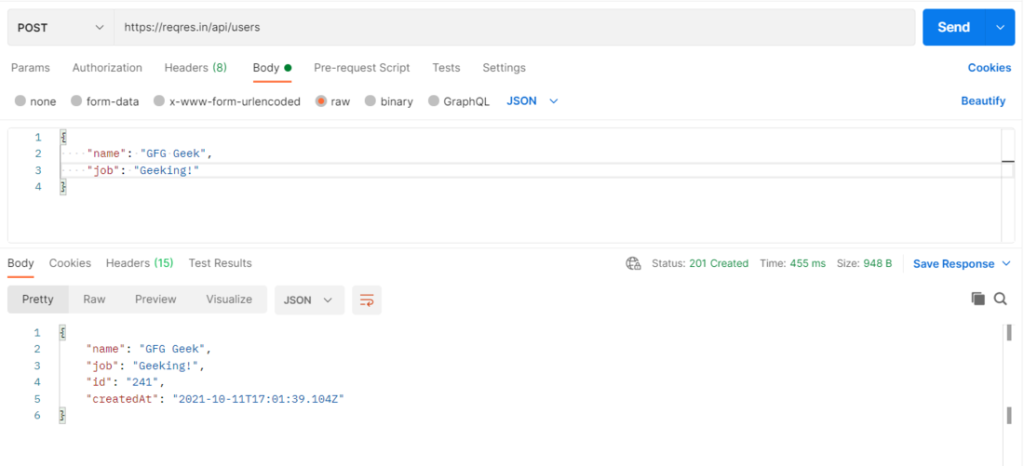
Here is a simple example of a Postman request to test the login functionality of a website:
Request: POST
URL: https://example.com/login
Headers:
    Content-Type: application/json
Body:
    {
        "username": "testuser",
        "password": "password"
    }
This request will send a POST request to the /login endpoint of the website with the username and password in the body of the request. If the login is successful, the server will respond with a 200 OK status code. If the login is unsuccessful, the server will respond with an error code.
You can use Postman to test a wide variety of aspects of your website, including:
- Functionality: You can test whether the various features of your website are working as expected.
- Performance: You can test how your website performs under load.
- Security: You can test for common security vulnerabilities.
- Accessibility: You can test whether your website is accessible to users with disabilities.
Postman is a powerful and versatile tool for website testing. By using Postman, you can improve the quality and reliability of your website.
Here are some additional tips for using Postman for website testing:
- Use variables to store common values, such as the base URL of your website or the credentials for a user account. This will make your requests more reusable and maintainable.
- Use assertions to verify the results of your requests. This will help you to identify any errors or unexpected results.
- Use the Postman Collection Runner to run multiple requests in sequence. This can be useful for testing complex workflows.
- Save your collections and requests to the Postman Cloud. This will allow you to share your tests with other team members and access them from anywhere.
Postman is a free tool to use for basic functionality. However, there are also paid plans that offer additional features, such as team collaboration, CI/CD integration, and performance testing.
How to use Katalon Studio for website testing?

Katalon Studio is a robust test automation tool that supports both web and mobile applications. It simplifies web testing by providing a user-friendly interface and powerful scripting capabilities. Here’s a step-by-step guide on how to use Katalon Studio for website testing:
Prerequisites:
- Katalon Studio Installation: Ensure you have Katalon Studio installed on your system. You can download and install it from the official Katalon website.
- Web Application URL: Have the URL of the website you want to test ready.
Steps to Use Katalon Studio for Website Testing:
1. Create a New Project:
- Open Katalon Studio and create a new project by clicking on
File -> New -> Project. - Choose
Weband provide a name for your project. ClickOKto create the project.
2. Create a Test Case:
- Inside your project, create a new test case by clicking on
Test Casesin the left sidebar and then clickingNew -> Test Case. - Provide a name for your test case.
3. Record Web Actions (Optional):
- Katalon Studio allows you to record your interactions with the website.
- Click on
Recordat the top toolbar, and then perform the actions you want to automate in the browser window that opens. - Katalon Studio will generate test steps based on your interactions.
4. Add Manual Test Steps (Optional):
- If you prefer manual scripting, you can add test steps manually.
- Click on your test case, and in the test case editor, click
Add -> Web UI -> [Action Type]. - Configure the action, such as
openBrowser,navigateToUrl,click,sendKeys, etc.
5. Create Test Objects:
- Test objects represent the elements on your web pages (e.g., buttons, input fields).
- Click
Object Repositoryin the left sidebar and create new test objects by clickingNew -> Web -> [Object Type]. - Provide a name, select the locator strategy (e.g., ID, XPath), and provide the locator value.
6. Parameterize Your Test Cases (Optional):
- You can parameterize your test cases to make them reusable.
- Define variables by clicking
Variablesin the left sidebar and then add new variables with appropriate data types.
7. Create Test Suites:
- Test suites allow you to group multiple test cases.
- Click on
Test Suitesin the left sidebar and create a new test suite by clickingNew -> Test Suite. - Add your test cases to the test suite.
8. Execute Your Tests:
- Select the test suite or test case you want to run.
- Click on the
Runbutton in the toolbar. - Choose the browser you want to use for testing, and Katalon Studio will execute your test suite or test case.
9. View Test Results:
- After the test execution, Katalon Studio will provide detailed test results, including pass/fail status, logs, and screenshots (if configured).
- Review the test results to identify any issues with your website.
10. Reports and Integration (Optional):
- Katalon Studio allows integration with various reporting tools and CI/CD pipelines for continuous testing and reporting.
- Explore the options available in the
Reportssection to generate detailed test reports.
By following these steps, you can effectively use Katalon Studio for website testing, ensuring the functionality, reliability, and performance of your web applications.
How to use SikuliX for website testing?
SikuliX is a free and open-source automation testing tool that uses image recognition to identify and interact with elements on a screen. SikuliX can be used to automate a wide variety of tasks, including website testing.
To use SikuliX for website testing, you will need to:
- Download and install SikuliX. You can download SikuliX from the official website: https://sikulix.com/
- Create a new SikuliX project. When you open SikuliX for the first time, you will be prompted to create a new project. Select the “Sikuli Script” project type.
- Record your test cases. SikuliX provides a built-in screen recorder that allows you to record your interactions with the screen. To record a test case, simply open the web browser and perform the actions that you want to test. SikuliX will record your actions and generate a test script script.
- Edit your test cases. The SikuliX test case editor allows you to edit your recorded test cases, add assertions, and parameterize your tests.
- Execute your test cases. SikuliX provides a test execution engine that allows you to execute your test cases manually or automatically. To execute your test cases manually, simply click the “Run” button. To execute your test cases automatically, you can save your test script as a Java file and then execute it using the Java Runtime Environment (JRE).
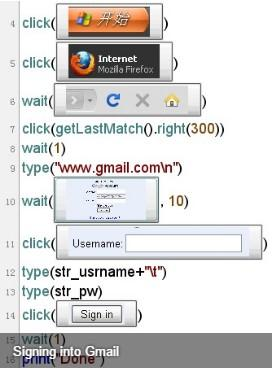
Here is a simple example of a SikuliX test case to test the login functionality of a website:
# Open the website
sikuli.openApp("https://example.com/")

# Wait for the login page to load
sikuli.sleep(10)

# Find the username text box
username_textbox = sikuli.find("username.png")

# Enter the username
sikuli.type(username_textbox, "testuser")

# Find the password text box
password_textbox = sikuli.find("password.png")

# Enter the password
sikuli.type(password_textbox, "password")

# Find the login button
login_button = sikuli.find("login.png")

# Click the login button
sikuli.click(login_button)

# Wait for the home page to load
sikuli.sleep(10)

# Find the home page logo
home_page_logo = sikuli.find("home_page_logo.png")

# Verify that the home page logo is present
assert home_page_logo.exists()
This test case will open the website, enter the username and password, click the login button, and then verify that the home page logo is present.
SikuliX is a powerful tool for website testing. By using SikuliX, you can automate a wide variety of tasks, such as:
- Logging in to a website
- Navigating to different pages on a website
- Entering text into fields on a website
- Clicking on buttons and links on a website
- Verifying the presence of elements on a website
SikuliX is a free tool to use and it is relatively easy to learn. However, it is important to note that SikuliX is not as reliable as other automation testing tools, such as Selenium or Katalon Studio. This is because SikuliX relies on image recognition to identify and interact with elements on the screen. If the images on the screen change, the SikuliX test scripts may fail.
Overall, SikuliX is a good option for automating simple website testing tasks. However, if you need to automate more complex tasks or if you need to achieve a high degree of reliability, you should consider using a different automation testing tool.
Thanks,